With the KNX Tool you can automate the creation of the Group Address structure using templates. You can create a total of three group address templates for different types of projects. When you import the project into ETS with the ETS App the group address structure will be imported and and can be quickly linked to ETS functions.
Note: The KNX Group Address feature is only available for the Business and Premium subscriptions. To upgrade your subscription, go to System > Admin Settings > Subscription.
A group address (GA) template has a set of main and middle functions, that can be e.g. either device based, building based or function based. You can then create sets of group addresses, called GA sets, that are placed in the main and middle structure. Each GA set is then linked to a device and when the GA structure is generated the GA set is multiplied with the number of channels.
The result is a GA structure that is completely based on the devices you have in your project as well as the right text for each channel, making the KNX programming much simpler.
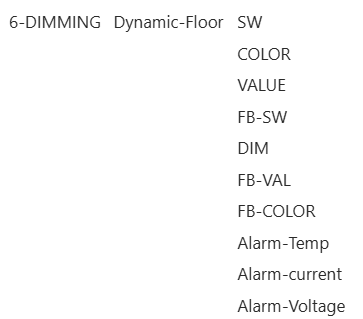
To the right you can see an example of a group address set.
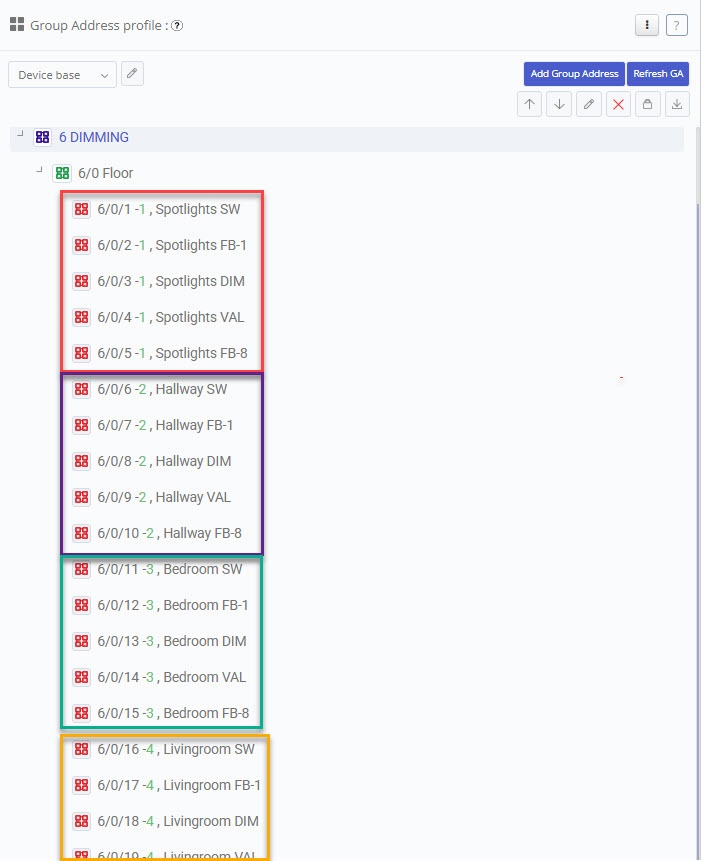
In this example the main group is “6-DIMMING”, the middle group is dynamic according to which floor the device is on, e.g. floor 0, 1, or 2. And the GA set has a total of 10 sub groups. If we configure a 4-channel dimming actuator to use this GA set, the KNX Tool will generate all the group addresses is this set for all 4 channels (see images below).
First, make sure you have the “Main and Middle Group” tab open. This is where you define the indexes for the main and middle groups. The indexes can either be static, i.e. function based, or dynamic, i.e. based on the building structure index.
To use dynamic indexing you need to activate “Dynamic Group Address Structure”. When it’s active (highligted in blue) you’ll see three aditional main groups: building, floor, and room. Their indexes can’t be edited because they are dynamic and will utilize the indexing from the building structure. You can add static middle groups to dynamic main groups.
You can also add dynamic middle group indexing, but that is configured later in the “group address set” tab. Dynamic middle group indexing can be used with both static and dynamic main groups.
Proceed to fill in the main and middle group structure you wish to use. Leave the fields you don’t want to use empty.
Below you can see an example of a filled in main and middle structure.
Now that you’ve defined the main and middle groups, you’re ready to start creating GA sets.
Start by configuring the general settings for the set.
Function: Specifies the functional category (e.g., lighting, or heating) the set belongs to.
Output print format: Defines the output format for group addresses in e.g. KNX Tool and ETS.
Start with: Change from which number the sub groups should start indexing. Default is 0.
Keep same subgroup number: When enabled all sub groups will have the same numbering. E.g. for when you want to use a GA structure based on functions and middle groups as sub-functions; 1/1/5 SW, 1/2/5 FB, 1/3/5 DIM, 1/4/5 VAL, 1/5/5 FB_VAL
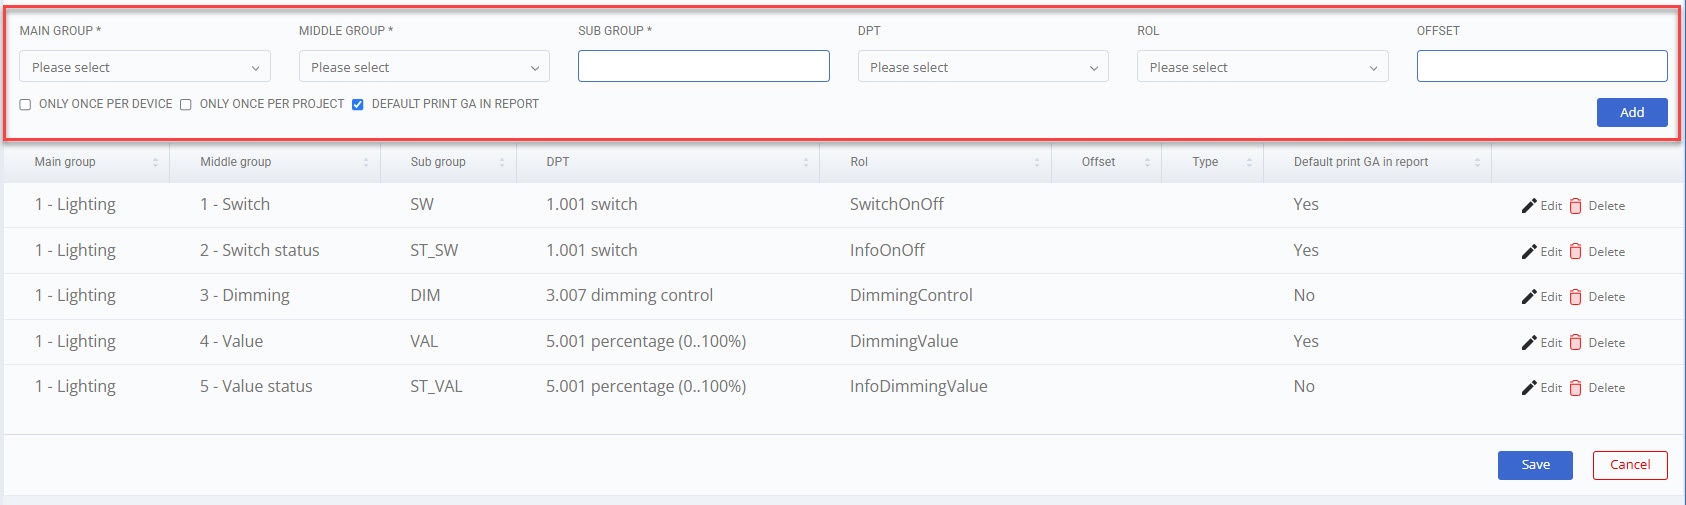
With the general settings in place, you can now begin adding sub groups to the set. To add a sub group first fill in the details in the highlighted area and click add to create the sub group. All sub groups will be listed underneath.
Main and Middle group: Choose a main and middle group from the lists. If you have dynamic GA structure enabled, you can choose dynamic room, floor, or building index as the middle group.
Sub group: The name for the sub group.
DPT: Specify the datapoint type.
ROL: Specify the role of this group address.
Offset: (Optional) Offset this sub groups index by the given number.
Enable only once per device: Enable this option if the sub group (e.g., error messages) should be created only once per device, even if the GA set is applied to multiple channels.
Only once per project: Enable this option if the sub group should be generated only once for the entire project, e.g. global alarms.
Default print GA in report: When enabled, the sub group is set to be printed in the Relay Report by default (can still be overridden in the report).
Example GA set. Fill in sub group information in the highlighted box.
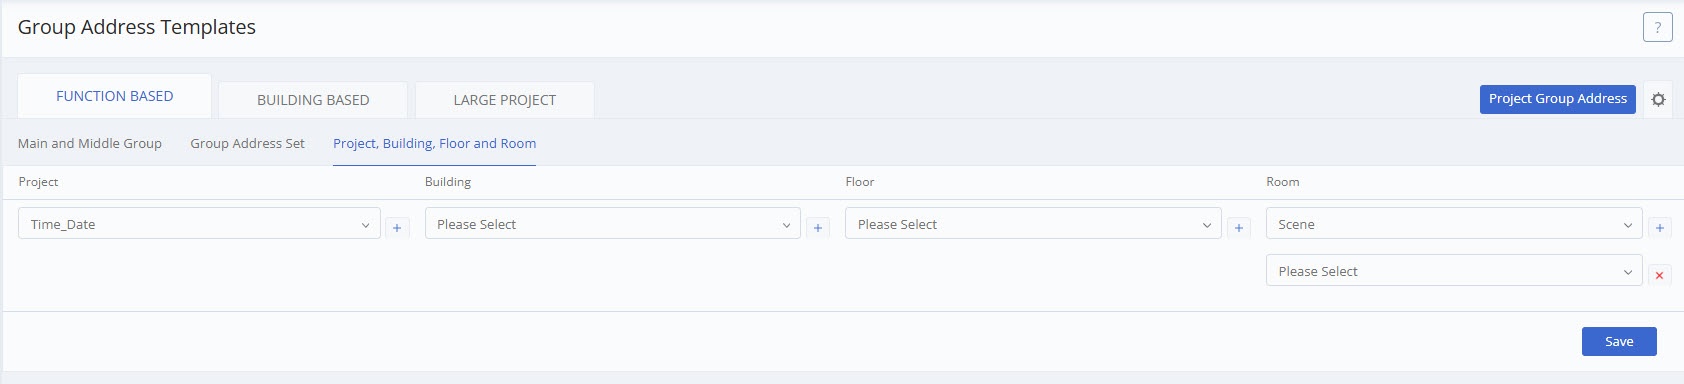
(Optional) Step 3. Assign Group Address sets to Project, Building, Floor and Rooms
In the Project, Building, Rooms tab, you can link GA sets to a project or a building structure.
This is useful if you have a specific sets of group addresses you always have in your project. You might e.g., want a scene for every room and fire alarm, Time and Date for the project as well as other project specific group addresses.
Click the plus icon to add more GA sets.
Visit the following articles to learn more on how to set up different KNX Group Address templates:
Function Based KNX Group Address Structure Building Based KNX Group Address Structure
Once you have created a GA template, you are ready to generate a GA structure for your project.
To generate a GA structure, open the Group Address View on the Drawing Board. You can choose which GA template to use from the drop-down list. When you are ready to generate the GA structure click ‘Create Group Address Structure‘. This will create a copy of the template and apply it to the project.
That means that you can also make project-specific changes to how you want the GA structure to be generated, and these changes won’t affect your other projects or the parent template. You can nagivate to a project’s group address settings from either the drawing board or the group address template settings.
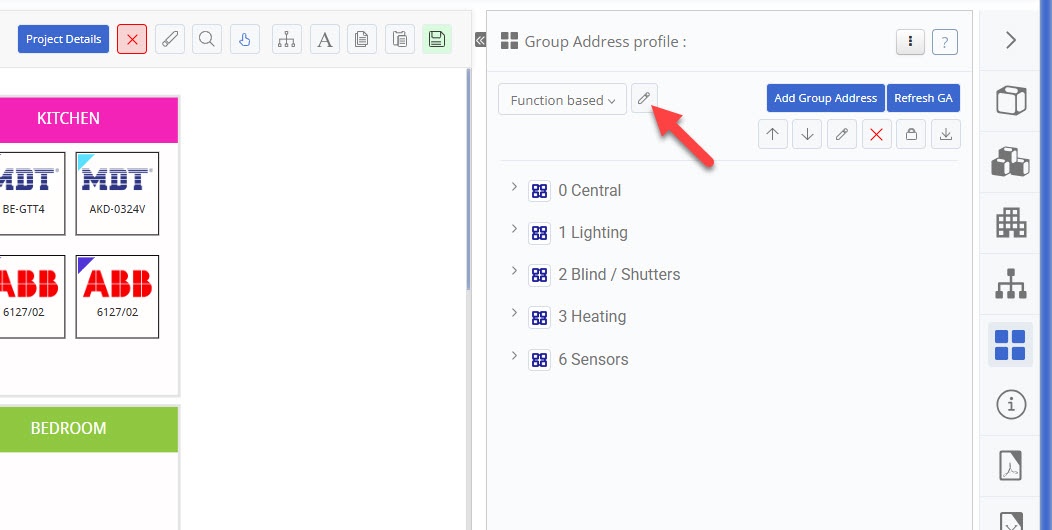
From the drawing board, go to the GA profile tab on the drawing board and click the pen icon.
Edit a project's group address settings.
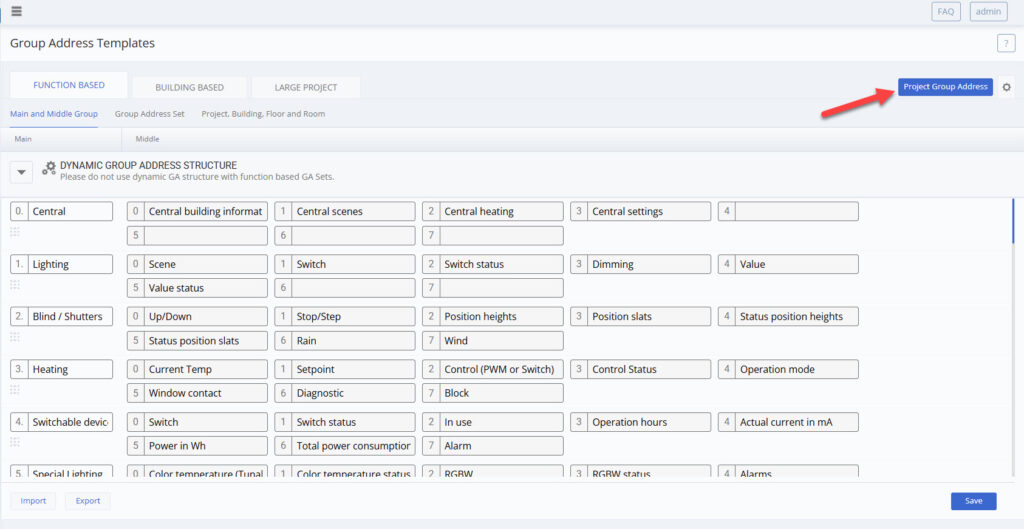
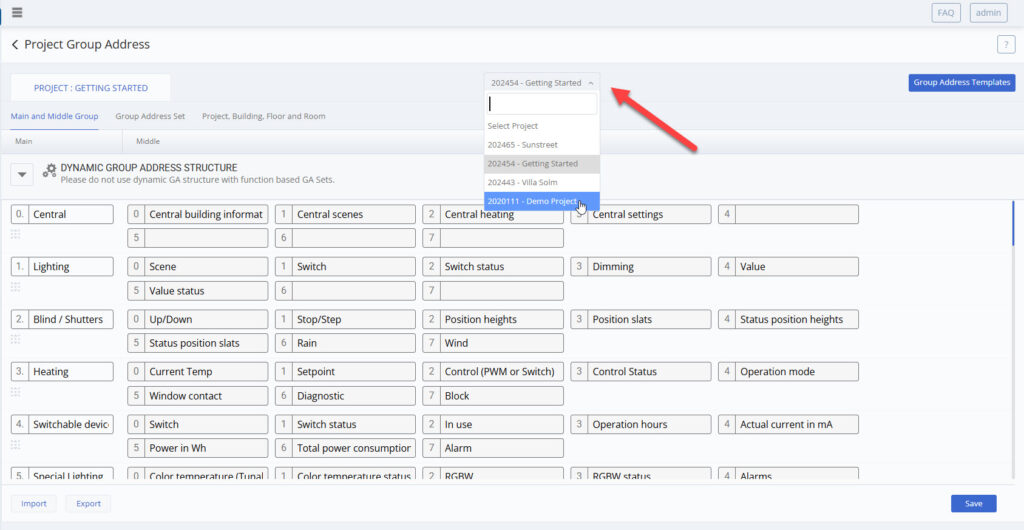
From thegroup address settingspage: 1) click on “Project Group Address” in the top right corner and (2) choose the project you want to edit from the drop-down list.
To have group addresses automatically generated for your devices, you need to link the appropriate GA sets to them. You can do this in two ways:
Link default GA sets in the Device Catalog This way, the GA sets will be automatically applied when you add the device to your project.
Manually assign a GA set in the project For devices without default GA sets, you can manually assign one when configuring the device.
You can always replace the default GA set for a device in a project if needed.
To link a default GA set to a device, navigate to the device catalog and open up the device. Edit the device and open up the Group Address tab. There you can assign a default GA set for each template.
When configuring a device, click on a channel and either confirm the preassigned GA set or assign one if none is set. Then, select the appropriate room and enter a channel text. If you don’t want to use all the group addresses from the set, click on the channel’s group addresses and deselect the ones you don’t need.
Refreshing vs Resetting the Group Address Structure
As you work on your project and add and configure devices, you will need to refresh the GA structure with the “Refresh GA” to see the changes take effect.
Sometimes you might need to reset the group address structure, e.g. if you add new GA sets to a device or create new GA sets in the GA settings. “Reset from local”, will reset the group address structure from the local projekt template. This can be useful to reset number sequences and reorganise the structure. “Reset from global” will overwrite the entire structure and generate it again from the original template.
You can move group addresses with drag & drop. The custom order is not affected by refreshing but will return to numerical order if you reset the group address structure.
In the Actuator Report page you can select which Group Addresses you want to show in the report (print). The “Group Address” button will select all GA’s for that device to be in the report.
Note: There is also the option to add Group Addresses manually when clicking on a Ga field (text box). If you add GA’s manually here they will only printed as text in the Actuator Report and not added to the GA structure.
You can also do individual changes to the channels by clicking on the GA field of a channel. Then, select the GA sets you want to be printed for that channel. You can also continue to edit the Group Address Structure in the Actuator Report. Remember to refresh the Group Address Structure after you’ve made updates to single channels.
To change the GA Set for a single channel, click the channel name. Then select a new GA set in the channel text popup window.
Note: If you change the default GA Set for a channel you need to reset the GA structure to make the change take effect. You can reset the GA structure in in the Group Address view on the Drawing Board.
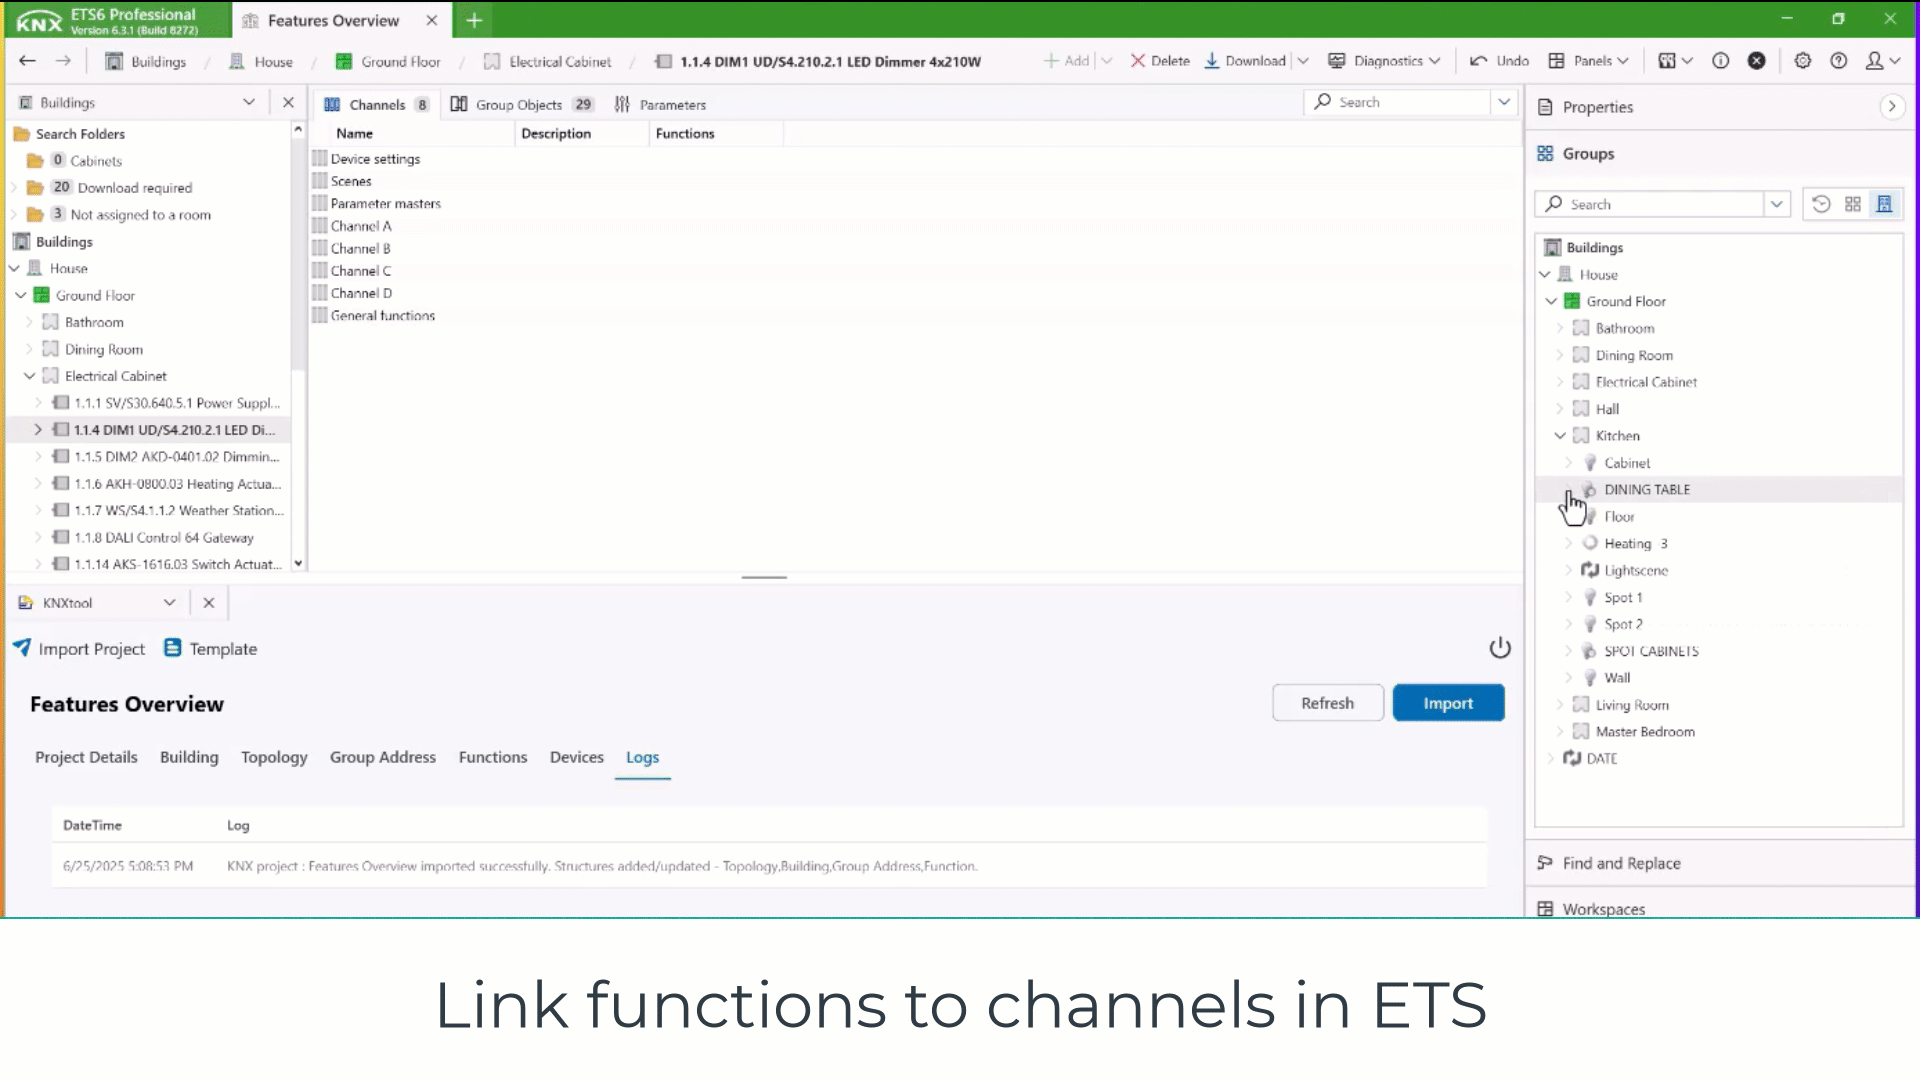
With our ETS app you can import your KNX Tool projects directly into ETS. This will import the building structure, devices, topology, and group address structure with ETS functions. You can import the KNX Tool ETS app from knx.org’s webshop.
When creating the GA sets for the GA template, you can link them to ETS functions. This makes the work in ETS much faster.
Once a project is imported, you can link functions to channels. In this way you can link many group addresses at once. Note: older devices may not support channels in ETS.
Tip: Add tags and channel numbers to your group address name to make it easier to know which device to link it to. You can change how the group address names are generated in the group address settings.
You can safely reimport the GA structure to update it. This will add new group addresses and overwrite the names of changed addresses. Unused group addresses won’t be deleted. The KNX Tool ETS App will also warn you before overwriting a group address that is linked to an object.
Click the link below to schedule a free live video appointment where we will show you how to setup and customize the KNX TOOL for your current projects.
This website uses cookies to improve your experience. We'll assume you're ok with this, but you can opt-out if you wish. Cookie settingsACCEPT
Privacy & Cookies Policy
Privacy Overview
This website uses cookies to improve your experience while you navigate through the website. Out of these cookies, the cookies that are categorized as necessary are stored on your browser as they are essential for the working of basic functionalities of the website. We also use third-party cookies that help us analyze and understand how you use this website. These cookies will be stored in your browser only with your consent. You also have the option to opt-out of these cookies. But opting out of some of these cookies may have an effect on your browsing experience.
Necessary cookies are absolutely essential for the website to function properly. This category only includes cookies that ensures basic functionalities and security features of the website. These cookies do not store any personal information.
Any cookies that may not be particularly necessary for the website to function and is used specifically to collect user personal data via analytics, ads, other embedded contents are termed as non-necessary cookies. It is mandatory to procure user consent prior to running these cookies on your website.