The drawing board is where you plan and build your projects.
This page goes over the menus and settings that you will need. It is not a tutorial, but more of a reference. To learn how to get your project started please see the Getting Started section.
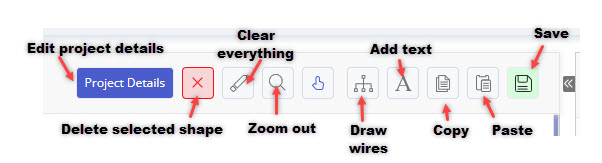
Project Details: Opens the Project Details page of the project. Clear Page: Click this button to remove all elements from the page. Zoom: Press this button to zoom OUT, or select an area by holding down the left mouse button to zoom IN. Select (default): Choose this tool to select elements. Right-clicking on an element opens the device/function details. Left-click is used to select elements and to move them around on the drawing board. Draw Line: Use this tool to draw lines. Start line with left-click, finish it with right-click. Text: Tool to write text on the Drawing Board. Save: Click this button to save the project. Delete: Press this button to delete the selected elements.
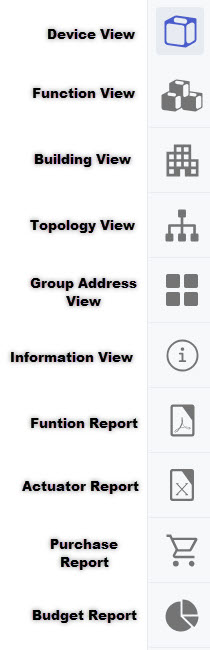
Device View: Click here to show the KNX devices in your project. It also opens the Device Menu in the tool box so that you are able to search and add more devices. Add devices via drag&drop. Functional View: Shows all the functions which are added to the project. Search for functions in Function Menu toolbox and drag them into a room. Building View: See the room structure of your project. You start building up your project here by creating the building, floors and rooms. Topology View: You are able to create a new device layout for each Area and Line. The currently selected line is showing above the drawing area on the left hand side – KNX LINE: 1.1.X is default. Information View: Click this button to see the details of the selected device/function. Instead of using this button you can also make a right-click on the device and it will also show the device/function details. Function Description: Opens the Function Description of the project. Relay Report: Opens the Relay Report of the project. Purchase Report: Opens the Purchase Report of the project. Budget Report: Opens the Budget Report of the project.
Click the link below to schedule a free live video appointment where we will show you how to setup and customize the KNX TOOL for your current projects.
This website uses cookies to improve your experience. We'll assume you're ok with this, but you can opt-out if you wish. Cookie settingsACCEPT
Privacy & Cookies Policy
Privacy Overview
This website uses cookies to improve your experience while you navigate through the website. Out of these cookies, the cookies that are categorized as necessary are stored on your browser as they are essential for the working of basic functionalities of the website. We also use third-party cookies that help us analyze and understand how you use this website. These cookies will be stored in your browser only with your consent. You also have the option to opt-out of these cookies. But opting out of some of these cookies may have an effect on your browsing experience.
Necessary cookies are absolutely essential for the website to function properly. This category only includes cookies that ensures basic functionalities and security features of the website. These cookies do not store any personal information.
Any cookies that may not be particularly necessary for the website to function and is used specifically to collect user personal data via analytics, ads, other embedded contents are termed as non-necessary cookies. It is mandatory to procure user consent prior to running these cookies on your website.