KNX Group Address Guidelines
To be an efficient KNX programmer and to make your KNX projects run smoothly from start-to-finish, you need to think about how you are going to configure and document your KNX Group Address (GA) structures during the design and planning stages of your projects.
In this guide we will outline the different types of KNX group address structures and the best practices to be used when designing, planning and configuring KNX system installations.
Why KNX Group Address Best Practices Are Important
Some of the most common problems associated with KNX installations and ETS programming arise from the following issues related to KNX group addresses:
• No clear overview or knowing where to find details in your KNX project.
• ETS programming is difficult and tidies when there is no clear KNX group address structure.
• KNX group addresses being poorly structured makes debugging difficult.
• KNX group addresses being poorly documented makes visualization difficult.
• No descriptions or details given for KNX group addresses or group objects.
• No flexibility in the design and configuration process which allows the installer/integrator to easily adjust GA’s (without making a ‘mess’ of everything else).
To avoid complications and to ensure trouble-free programming in ETS, KNX group addresses need to be structured correctly, well-documented and easy to read or understand (even for others).
Different types of Group Address Structures
Sometimes you may need to have different types of GA structures in your arsenal, to fit and suit the different types of KNX projects you work on.
There is no ‘magic’ Group Address structure that is superior or works better than all others. The best GA structure is simply the one you know best and feel comfortable with using.
However, there are still pros and cons for each of the different structures which we will outline below.
Function Based, Building Based and Device Based KNX Group Address Structures
We can roughly segment the different GA structures into 3 main groups — function based, building based and device based.
1. Function based group address structure (promoted by the KNX association).
2. Building based group address structure (mostly used in bigger projects).
3. Device based group address structure (more unknown but it is still worth to mention).
On top of that, there are many different variations of these groups.
In fact, a device based style can be seen as a variation of the function based GA structure.
To simplify these Group Address principles, it is best to see them as only 2 different parts:
Main and Middle Structure — which sets the frame of how we build everything up.
Group addresses that are the same for all types of structures — which we can call a GA Set).
By separating the GA Set, it becomes more clear on how to build the Main and Middle structure.

Most common GA Sets:
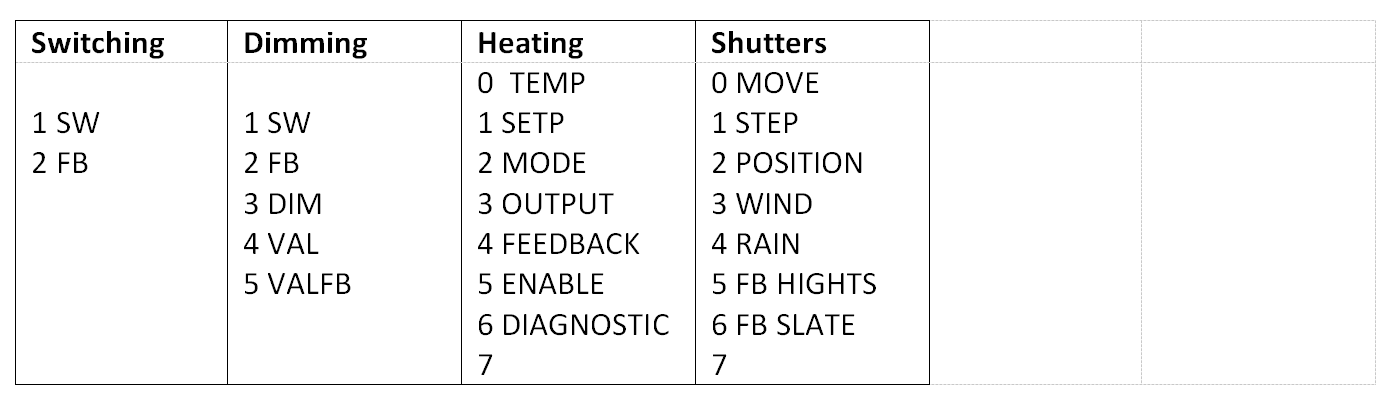
We can also see the differences of the Main, Middle and Sub group in this matrix.

* GA’s spread on different Middle groups
** All GA’s in the same Sub group
So when adding your Group Address Sets to these different structures, you will have something which looks similar to the example shown below.
NOTE: It is important to understand the difference between a group address structure and a group address SET.
If you do this separation, you can start to define the group address set you prefer to use and then start to place it inside your structure of choice.
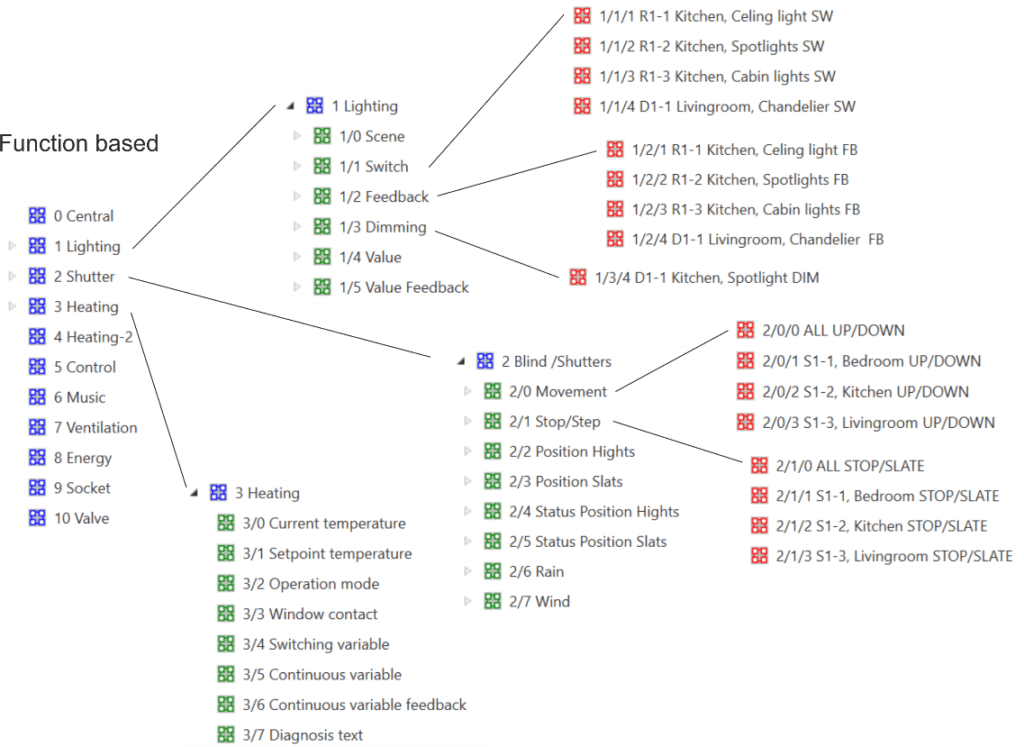
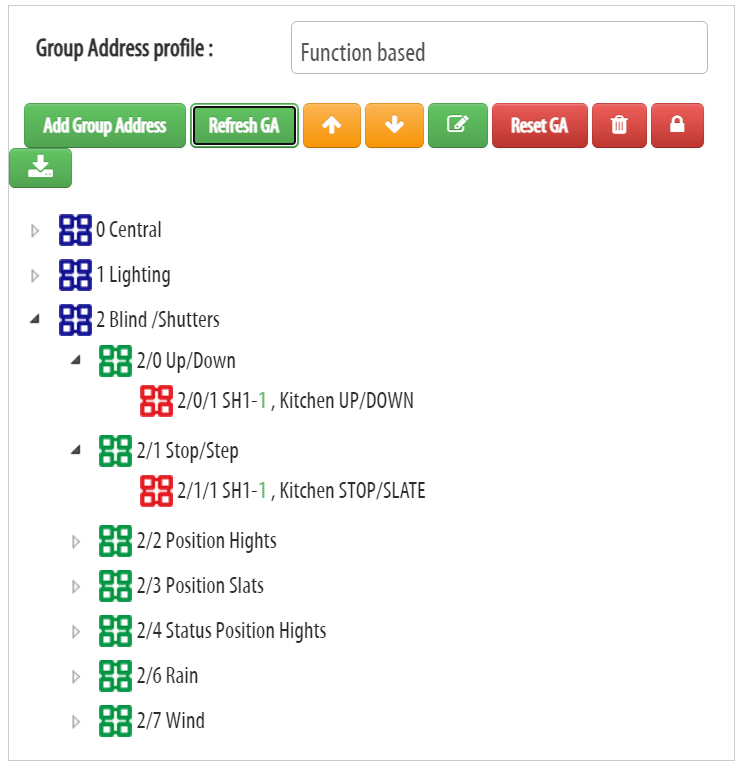
The Function Based Group Address Structure
In a function based structure you have the Main group as function (e.g. Lighting, Heating, Shutter, Energy, etc).
The Middle group is a set of sub functions that are specific to the main function (basically one sub function per group address).
Meaning if you have 5 GA’s, you also have 5 sub groups in the Middle structure (see example below).
This structure is clear for smaller projects and Group Address Sets like lighting and smaller heating circuits.
It is very understandable and easy to figure out which GA is switching on lights and which is dimming.
The Sub group number is even telling you which channel number you have (if you have one GA Set for each channel).
The main problem with this type of GA structure is when you add more complex GA Sets (where 8 group addresses are not enough), and you need to spread out the GA’s on many Main groups like Heating-1, Heating-2 and Audio-1, Audio-2 etc.
At this point you have lost the overview of the GA Set.
It is also difficult to keep the sub group number the same, for example with lighting where you mix switching and dimming channels as you can see on dimming channel D1-1 in the image above.
Also, adding/renaming a GA Set is tedious and time consuming when you have to switch between middle groups.
The same thing goes when linking GA’s in ETS.
First you have to select a middle structure and search for a sub group number, then switch to another middle group and search for the sub group number again!
This makes the entire process much slower, especially when you start to do visualization and need to search for many different group addresses.
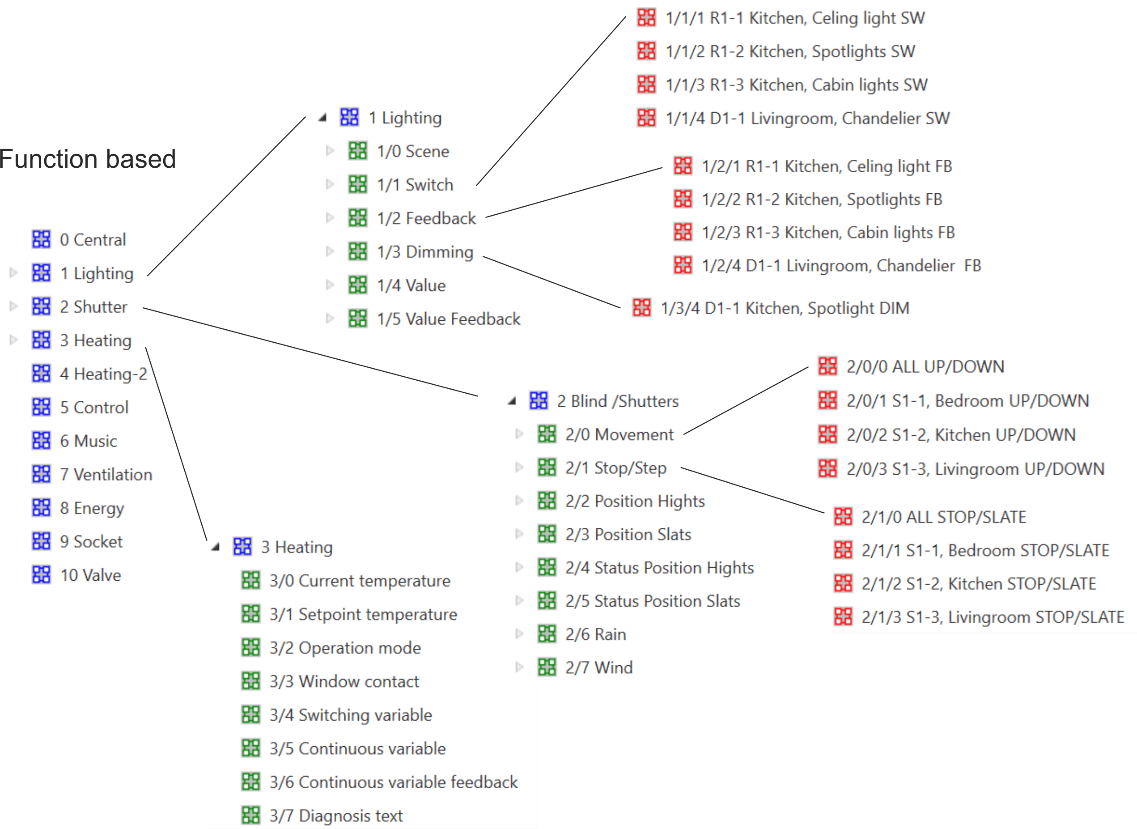
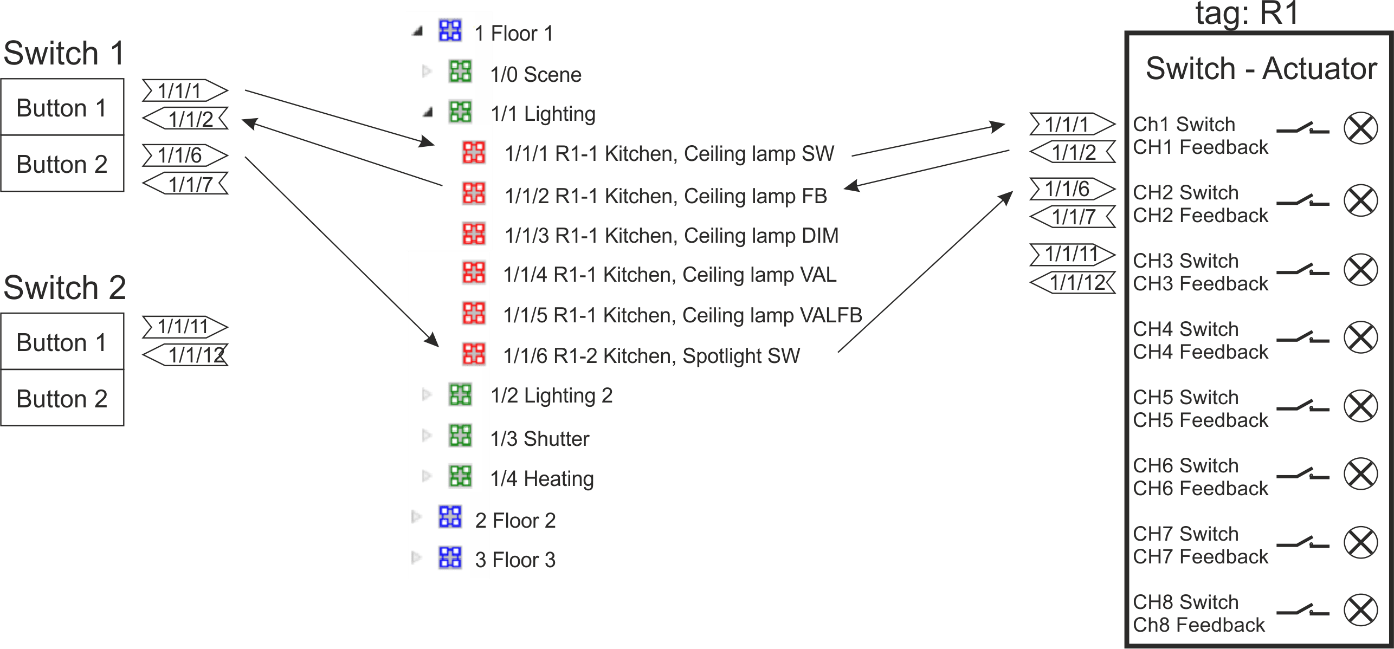
Below is another image of the GA Sets Dimming in a Function based structure.
In this example, you can see the Main Structure with the functions and the Middle group with the sub functions.
You can also see how the GA’s will look on the push-button side, as well on the actuator side.

Take notice how the arrows cross each other on both sides in the example shown above.
This visualizes the complexity of the linking of GA’s which you will have to do when combining group objects.
When debugging this, you will have to check both sides of the structure, on the push-button side and on the actuator side, because the linking can be wrong on both sides (compared to the device based structure outlined later in this guide).
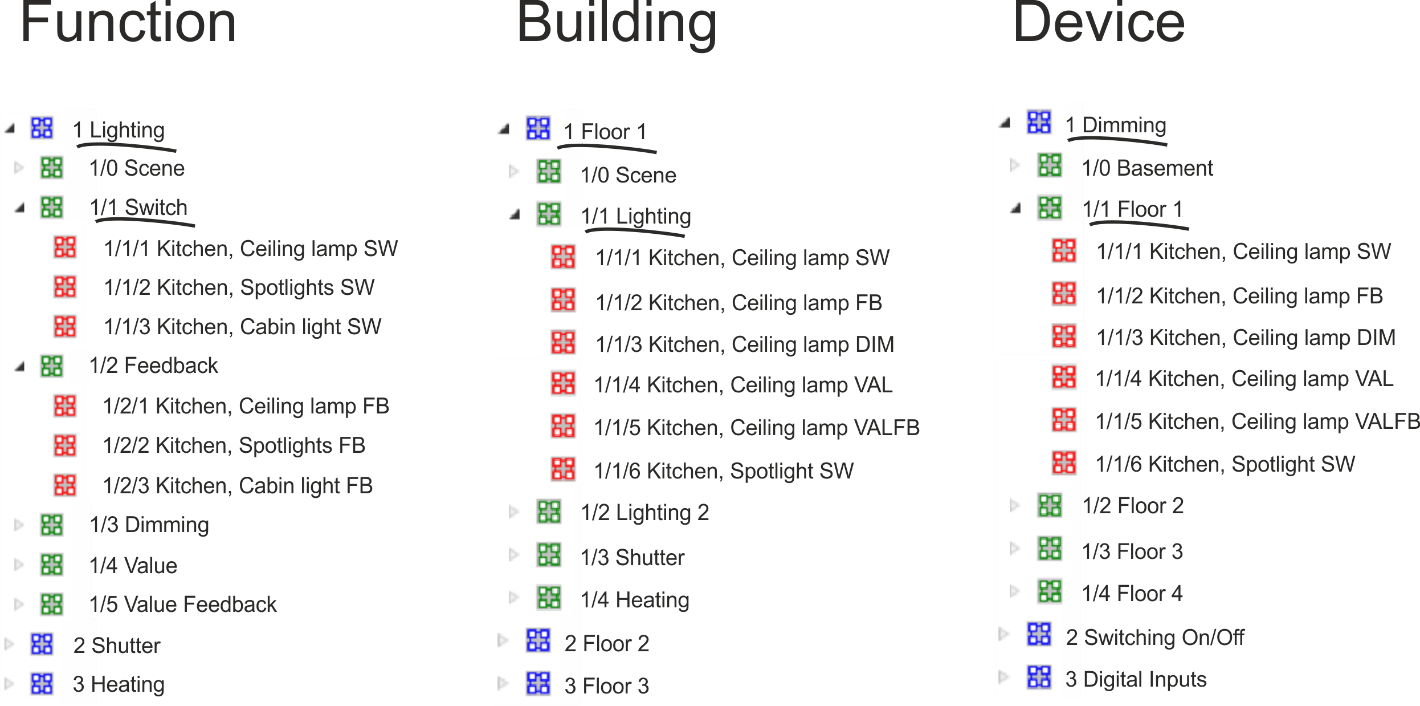
The Building Based Group Address Structure
The building based structure is mostly commonly used for bigger KNX projects, where you have more channels and where it is necessary to structure the functions according to the building, to split up the lighting on many Main levels.
One of the main differences here is that you will have the whole GA Set in the same Middle group (as seen in the example below).
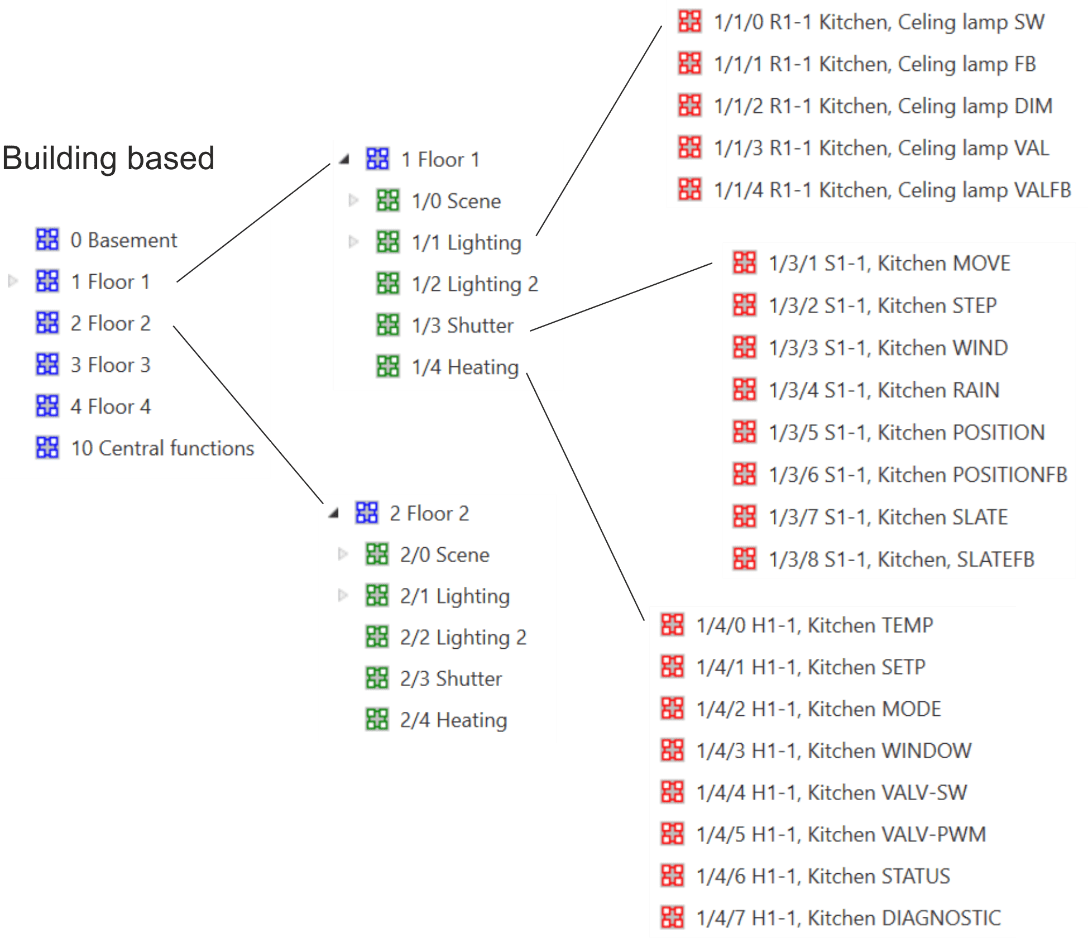
With this structure you can quickly figure out that the space is limited.
For example, with Dimming that has 5 GA’s you can have maximum 51 channels per Middle group, which sometimes forces you to also divide the middle group into e.g. Lighting1 and Lighting2, or you have to divide the Floor into sections so you have Floor1-east and Floor1-west.
Having the GA Set in one Middle group makes it harder to figure out which physical channel a specific Group Address is linked to (making KNX documentation even more important).
However, renaming group addresses and linking objects in ETS is much faster since you do not have to scroll back and forth in the main/middle structure.
Below is an image visualizing the picking of GA’s when combining the group objects.
There are less crossing of arrows, meaning when you pick group objects it is more “take one object and drag it” then take next and drag it and so on.
Once a channel is done, you scroll down and then you do the same for the next channel.
With less scrolling between middle groups, it is much faster to build the group addresses.
The Device Based Group Address Structure
The device based structure is kind of a mix between the function based and building based structures outlined above.
Instead of having functions for the Main group, you have device type like On/Off, Dimming, Heating etc.
And for the Middle group you have the building structure instead of sub functions.
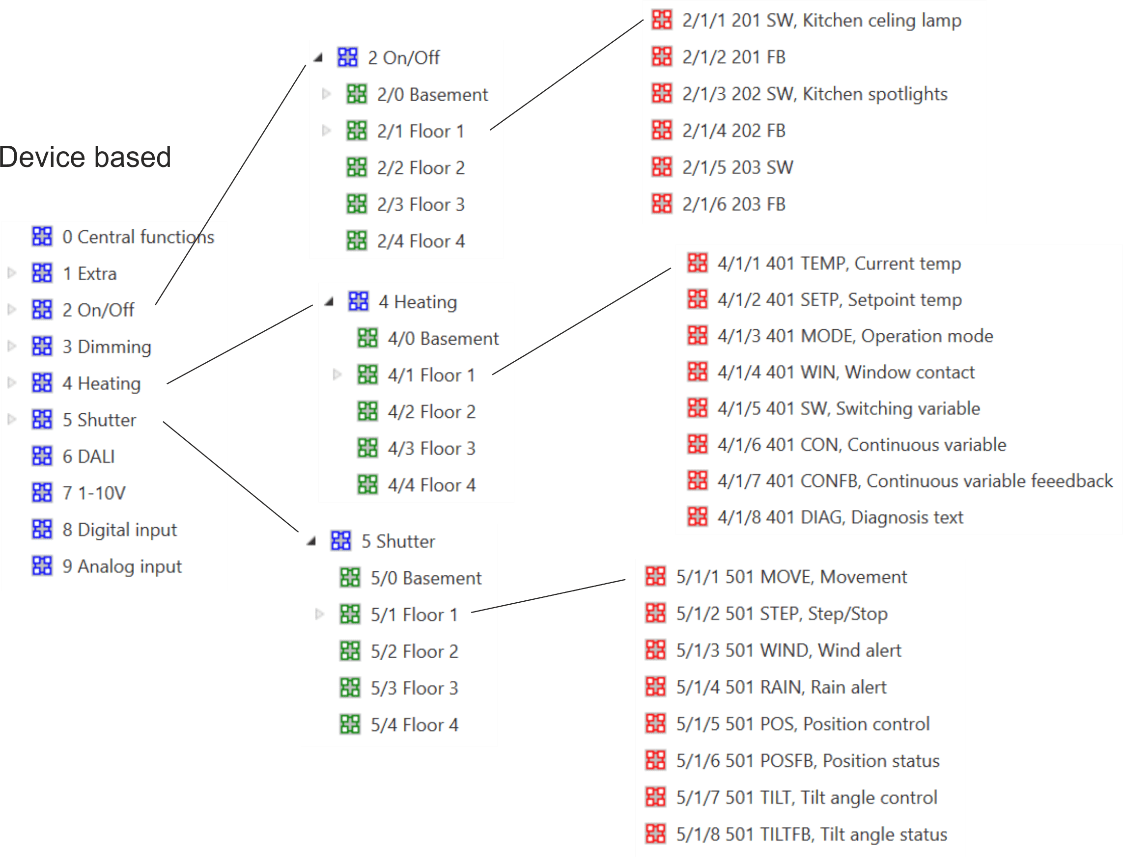
You can also think of it like this – everything evolves from a physical actuator – so for each physical actuator channel you create one GA Set.
The Main group is named after the actuator type. On/Off, Dimming, Heating etc. Similar to how the function based and the Middle structure is according to the building structure.
And just like in the building based structure, you will have one Group Address Set for each channel in one Middle group, which makes the GA linking much easier.
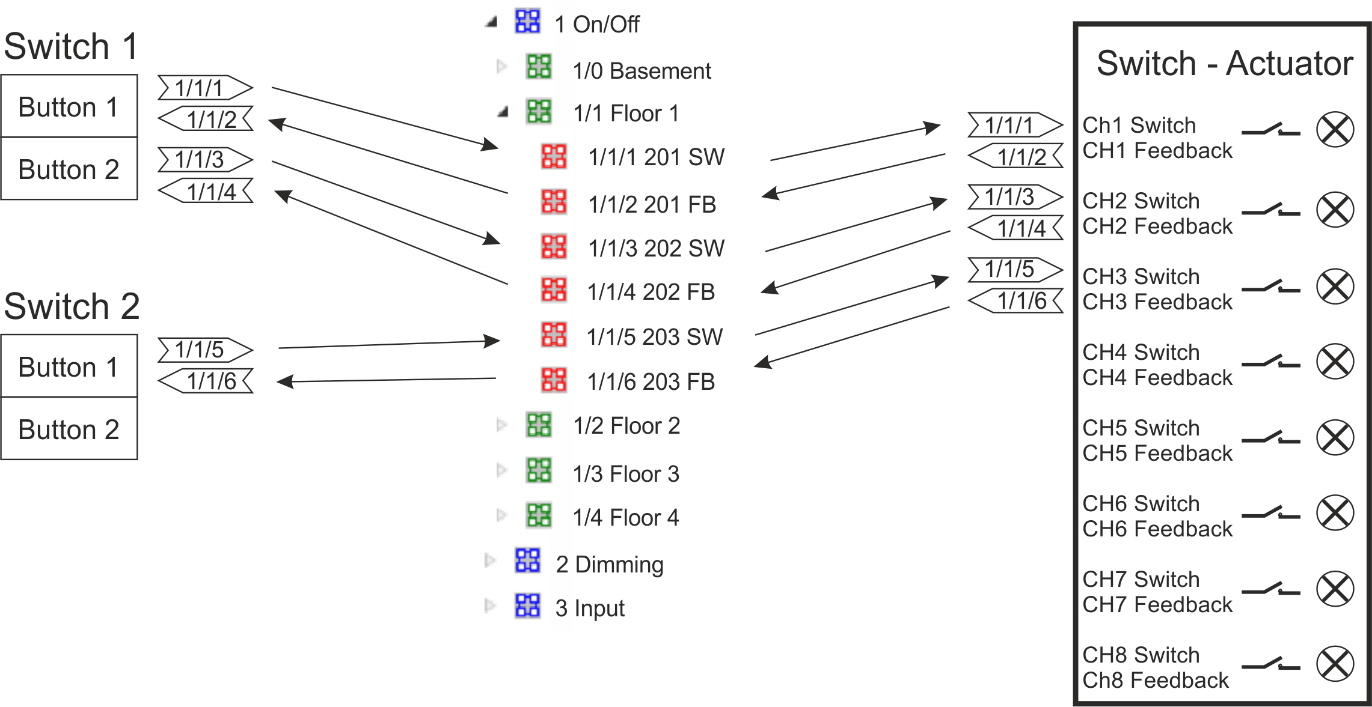
Since the group address structure is built around a physical device, you can create one GA Set for each channel of the device and do the linking on the actuator side just straight forward.
This makes linking on the actuator side very fast and debugging is much easier.
The only ‘thinking’ you have to do is on the push-button side, where you have to decide which channel this button should control.
Debugging also becomes easier when you know the actuator side doesn’t change and it’s mainly the linking to push-buttons which needs to be checked when making any changes.
A helpful tip is to use a running number for the device channel which makes it easier to copy and reuse the Group address structure.
This also makes it easier to be used as a reference in drawings/documentation.
For example 201 means On/Off channel 1, 202 channel 2 etc.. And 301 DIMMING channel 1, 302 channel 2 etc.
The main difference here is that you do not name the group addresses after a specific function in your project, but rather after a physical channel!
This makes copying of the group address list from project to project faster and easier.
However, if you are not naming the group addresses but just keeping the numbers, then you need a document or some list that links the number 201 with a name “Kitchen, Ceiling lights”.
This is where having proper documentation becomes extremely important.
What is the best Group Address Structure to use for your KNX projects?
As we established at the beginning of this guide, there is no real ‘best structure’ to be used.
The best group address structure to be used is simply the one you feel the most comfortable with using.
And it is most likely that you will want to mix different styles of GA structures into your own process, however there are a few things which you do need to consider first.
- Try to make the structure as self-documented as possible. For example, the sub group number should correspond with the channel number to make debugging easier.
- Name your group addresses with a clear name. Only indexing and coding of the name is practical when you create the GA structure, but it takes you a fraction of a second each time you have to work with the address when you have to remember it (or you need to do a quick cross reference). You also need to think of how hard it is to change the name for a Group Address if the installer has moved channel 5 to channel 9. The more text you have to rewrite, the bigger chance there is to forget the old text you previously used. This will ultimately mess up the readability of your KNX project (the functions from ETS will really help a lot here).
- Think about the time you spend linking GA’s in ETS. If you have to continually search for GA’s all the time when linking GA’s to objects, then you should consider streamlining the structure (use functions in ETS or have the GA set in one middle group). Ideally, you should be able to open a device in Building structure and show all objects for a certain channel. And in a different panel, you open the group address structure and you can link all objects without the need to scroll in the group address panel.
Straight forward linking:

One of the most efficient ways to use GA’s is to have a mix of both Device and Function based structures — as this makes it easy to create the structure according to the devices you are going to put into the KNX project.
HELPFUL TIPS:
KNX Function Abbreviations
Some common abbreviations used for the functions in are:
SW – Switching
DIM – Brighter/darker
VAL or VDIM – Value dimming
FB – Feedback
VFB or VALFB – Value feedback
SA – Switching actuator
DA – Dimming actuator
BA – Blind actuator
BI – Binary input
HA – Heating actuator
MAN – Manifold
RAD – Radiator
FCA – Fan coil actuator
KP- Keypad
LK- Light keypad
SP – Sensor plate
RTR – Room temperature rollover (mode change)
PRS – Presence object to activate heating
WDW – Window object to set back heating
SET – Set point
SETFB – Set point feedback
IND – Indication
Functions in ETS
A helpful tip creating and setting up your GA’s is to use functions in ETS.
This is a new IoT feature in ETS, which at the time of writing this guide, is still under development. However it does have huge potential and it will change how you work in ETS as well as how you do visualization.
A function in ETS is basically a way to group GA’s into one function with some additional parameters, such as type of function (e.g. switch/dimming/heating/socket) that has group addresses with information such as Data Point Type and roles.
This tells ETS exactly which GA is used for switching and which is for feedback and enables automatic linking.
This will be an important aspect in the future when creating visualization and for linking group addresses to IoT devices or other protocols.
Before it was hard for a visualization to automatically create such things as buttons for your lights or heating controls for your heating circuits. You had to create the object your selves by selecting the function, place it in a room, linking all GA’s to it etc.
With a function you can define all of this by giving roles to your GA’s.
As an example, the company XXTER have recently implemented this feature so they can very quickly create a full visualization where you get the room structure, the function (such as lights in the room) and also what you can do with it.
Another very important aspect of this is that it also makes programming much faster and easier in ETS with less debugging issues.
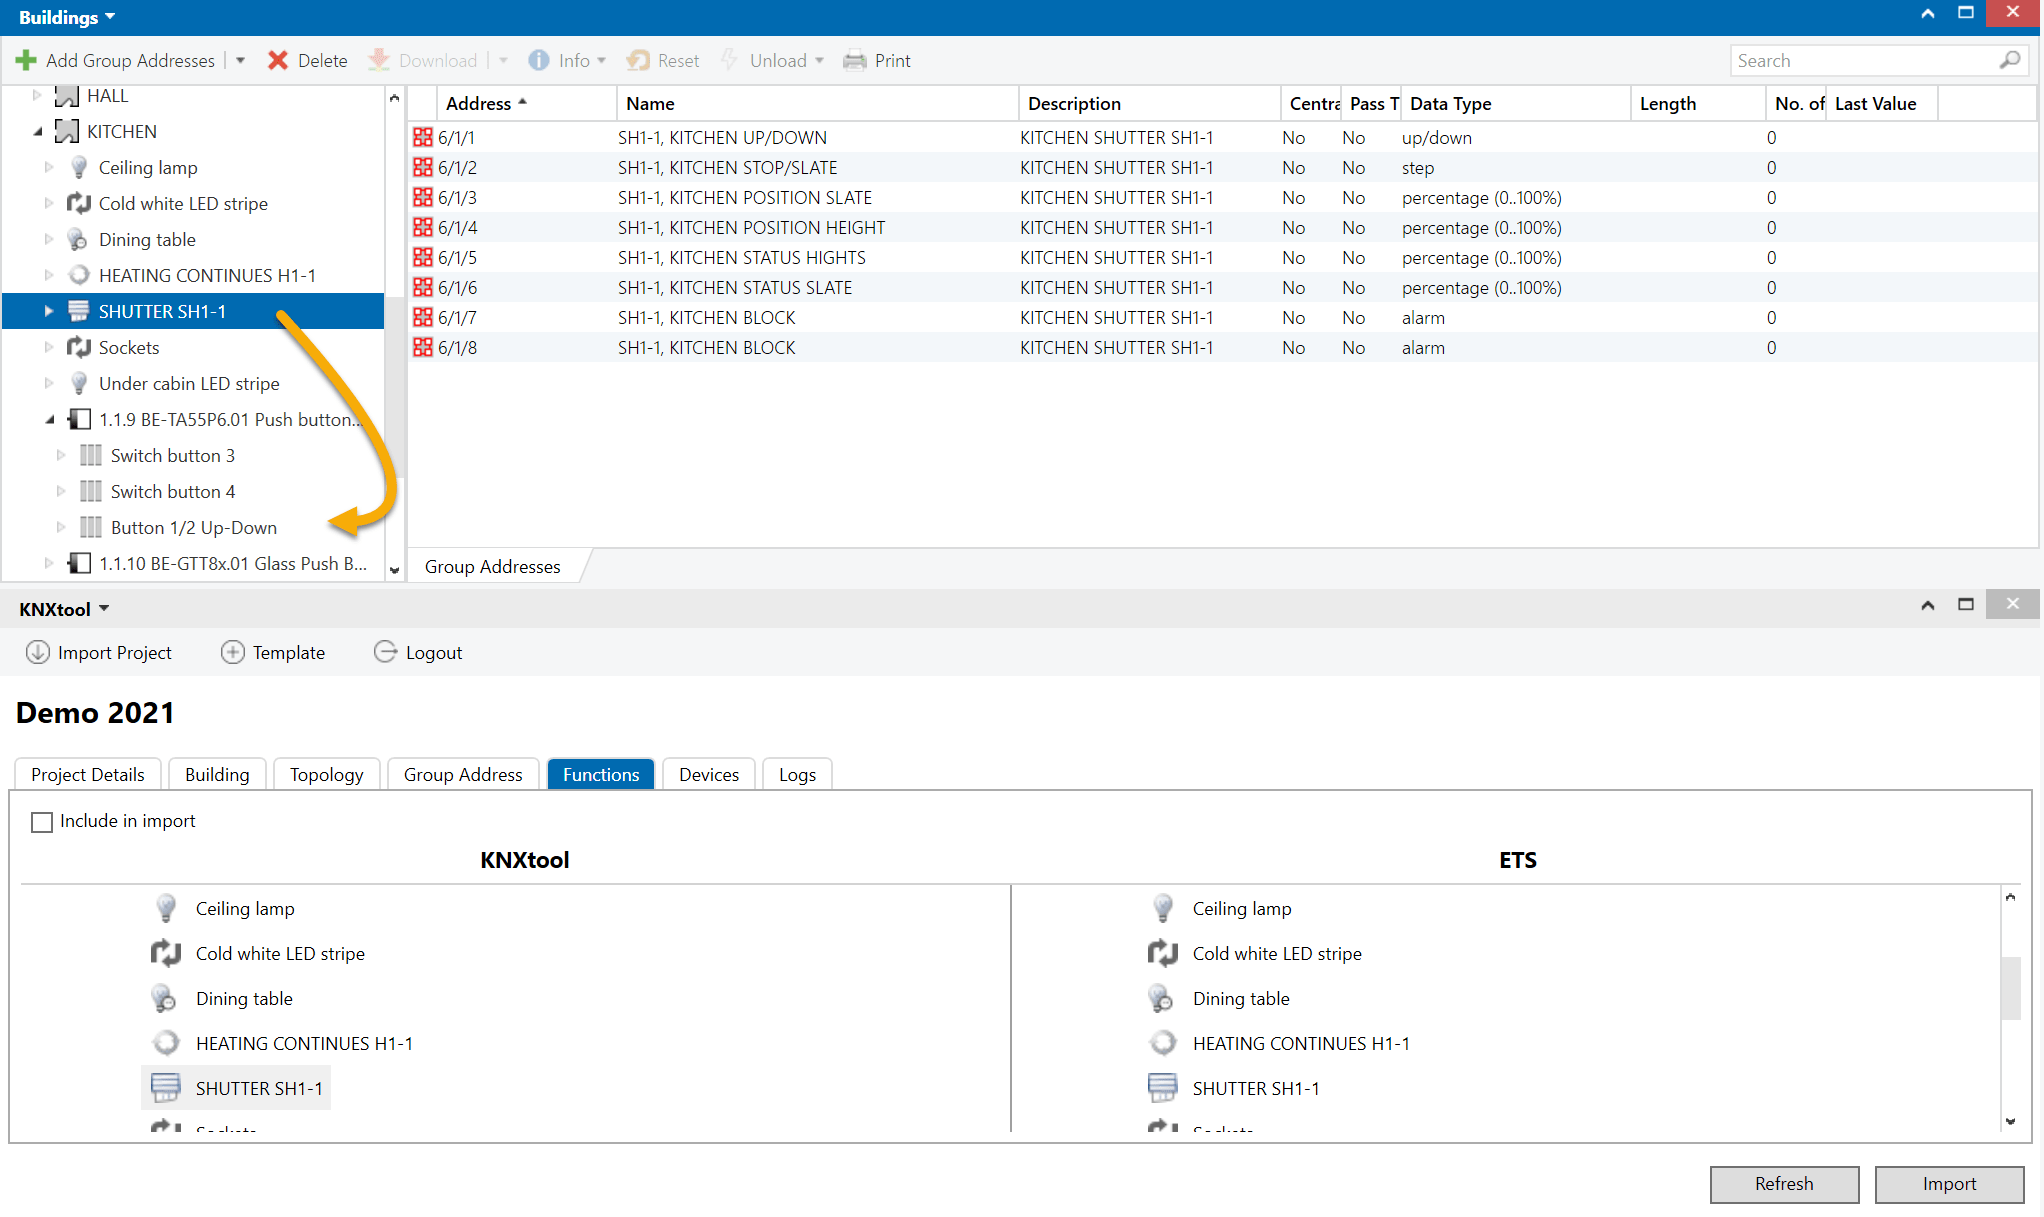
In the above image you can see 7 functions in the Kitchen. And if you open the functions you can see the group addresses linked to the function — as well as if the GA is linked to any objects.
Functions gives you a really good overview of what’s going on in a specific room.
Another great benefit with these functions is if you have devices that support channels, then you can simply drag one function on to one channel and the linking will be done automatically.
This helps to speed up the entire ETS programming process even more.
KNX Group Address Structures Using The KNX Design and Planning Tool by BEMI
The KNX Design and Planning Tool by BEMI provides KNX professionals with a much faster, easier and more reliable system to create, configure and manage KNX Group Address structures.
The KNX Tool by BEMI allows you to get your GA naming right and create functions automatically — then import the project details directly into ETS.
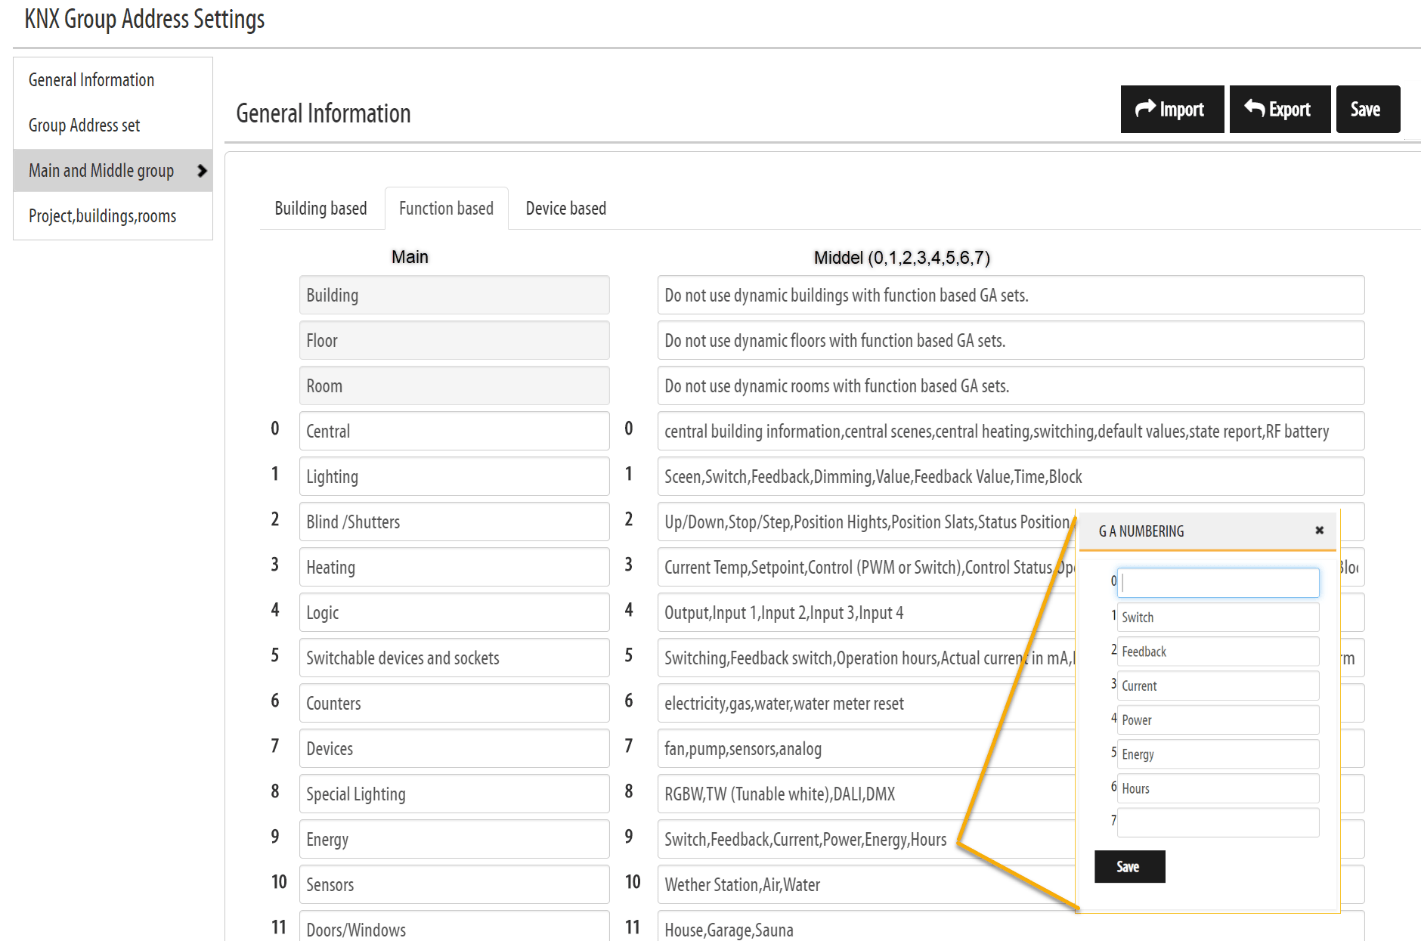
With the KNX Design and Planning Tool you can set up your Main and Middle structure effortlessly, and play around with the different profiles to achieve your desired outcome.
In this example below, you will see we have 3 different profiles for this specific project — Building, Function and Device based.
But in your live instance, you are more likely to have two different structures. One for small projects and one for large projects.
Once you start to lay out all functions you have in your projects, then you can quickly see how everything will fit together. And you can also adjust your Main and Middle structure.
Once you have created your Main and Middle structure, you can then start to build your group address set. When you place the sub groups in the Main and Middle structure, you quickly gain a detailed overview of how everything fits together.
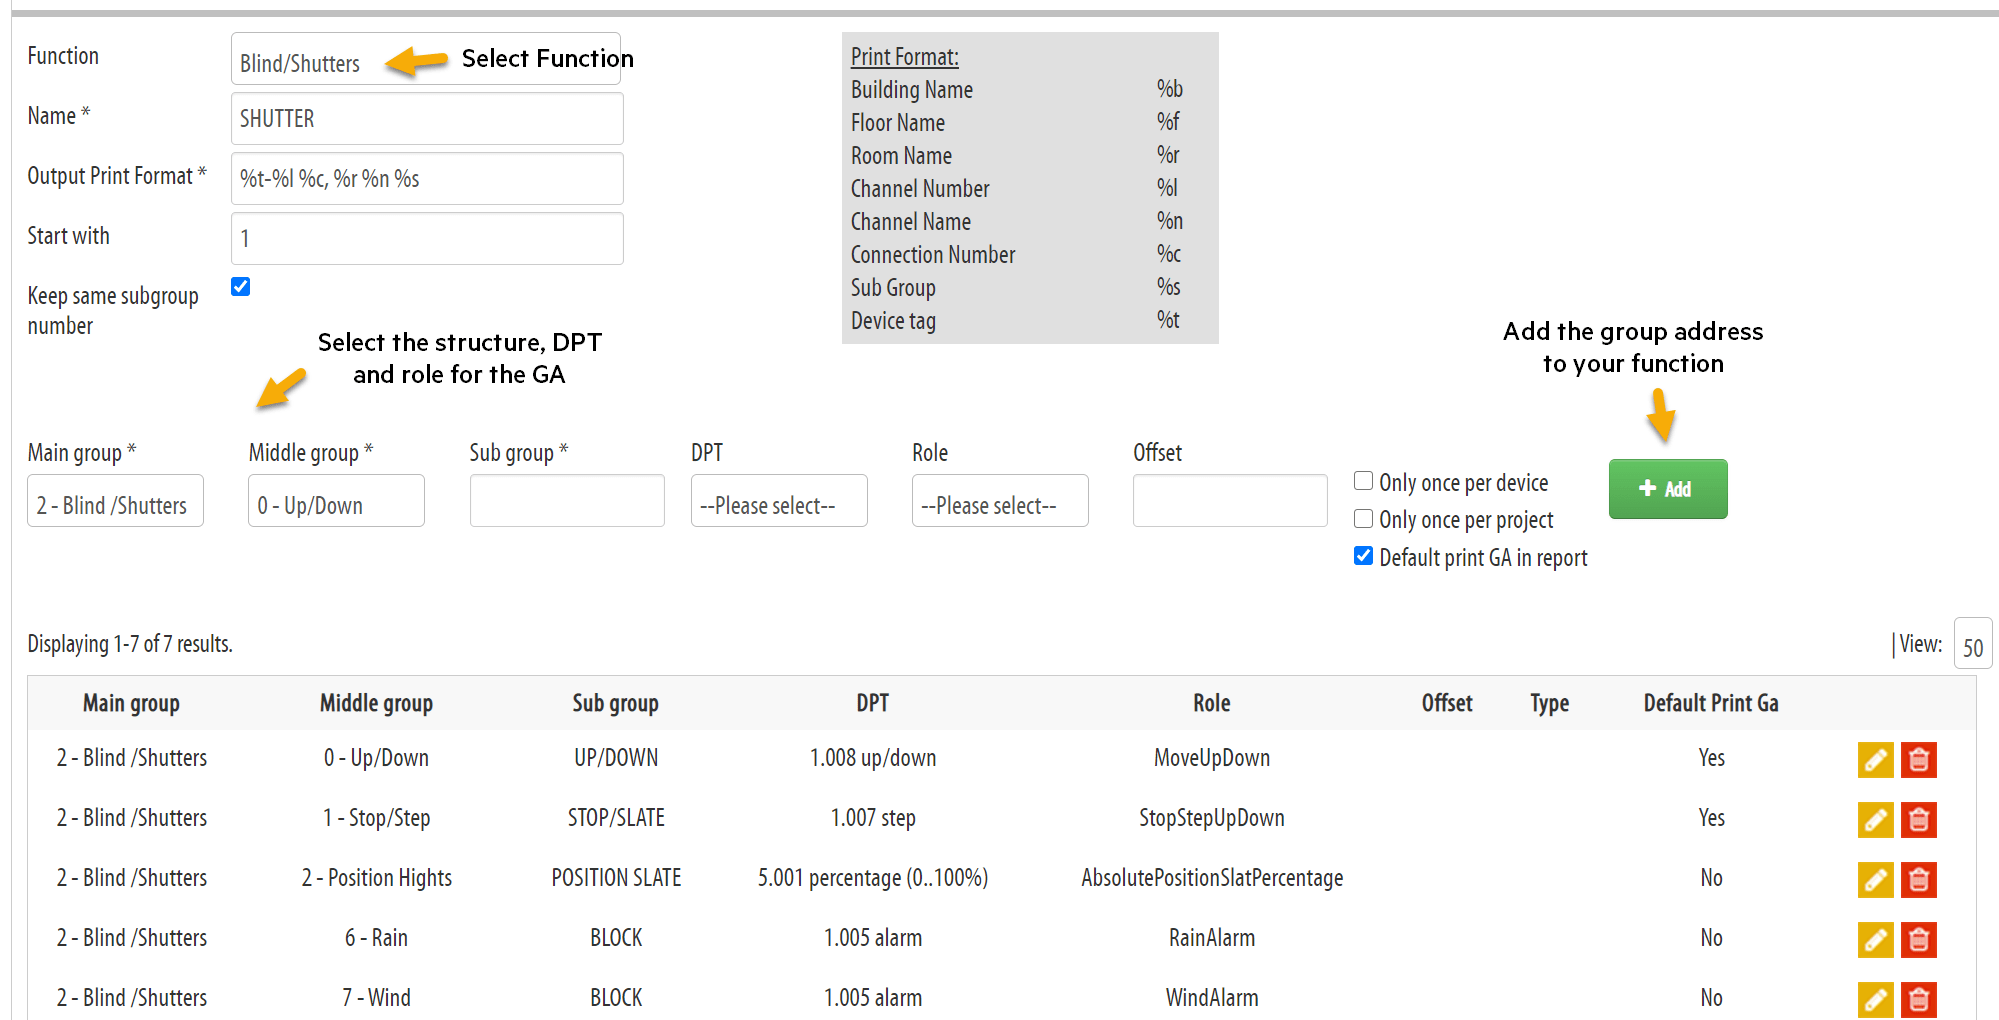
After you have created your group addresses, now it’s time to test the structure.
You can do this very easily by simply opening up a project with some devices, then you select a device and fill out the channel information like the function “SHUTTER” for a Shutter channel, as well as other information like room name and channel name.
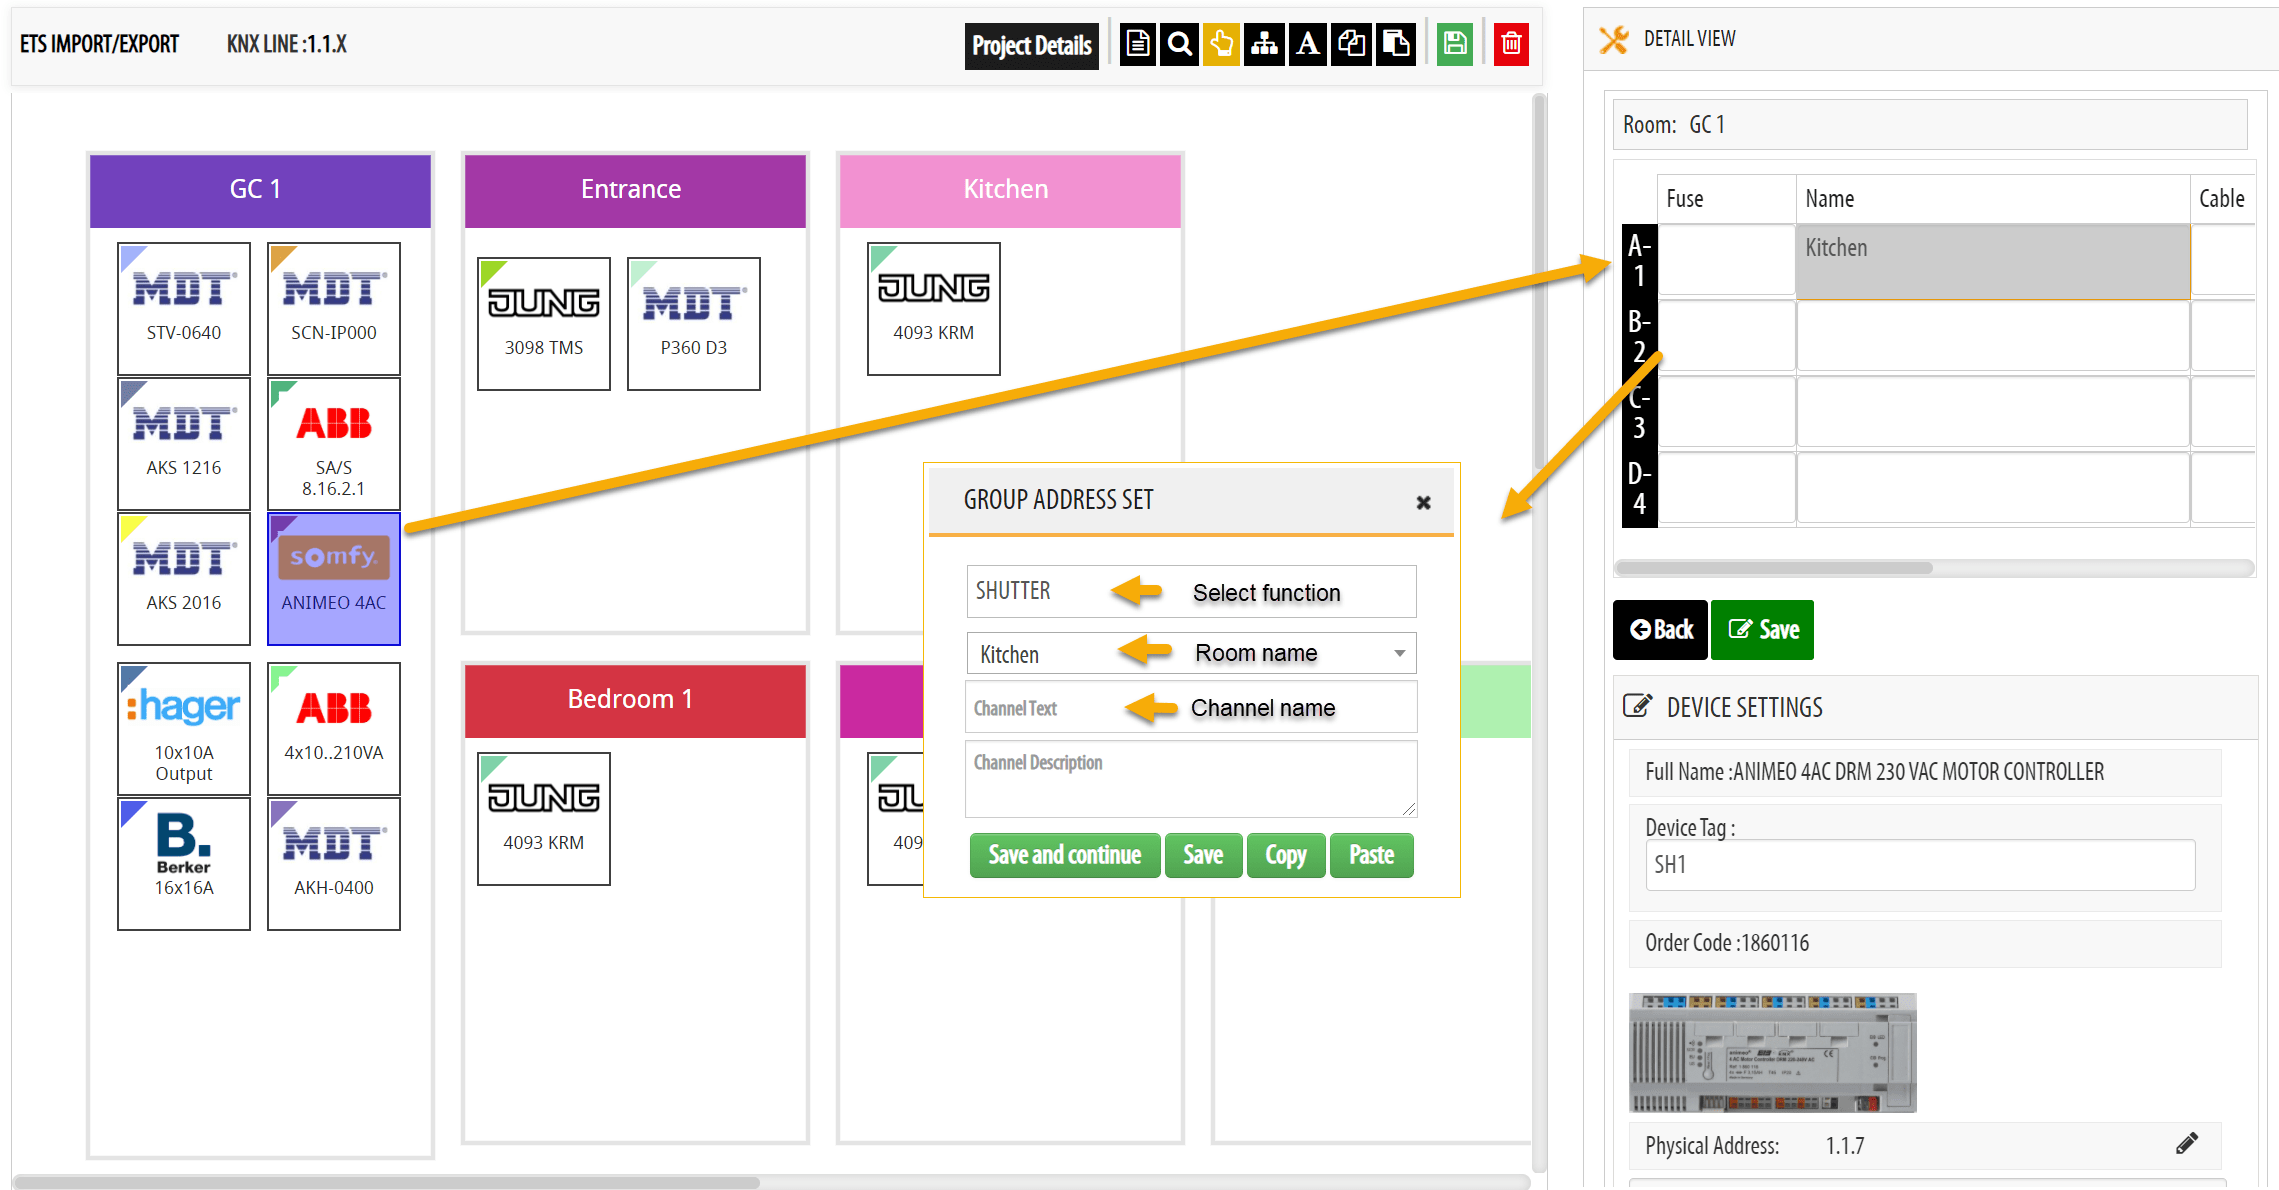
This will create the group address structure with proper naming of the group addresses as well as functions ready to be imported into ETS.
◉ OTHER KEY FEATURES OF THE KNX DESIGN AND PLANNING TOOL
The KNX Design and Planning Tool by BEMI is an all-in-one solution which allows you to design, plan, manage, budget and document KNX system installations using one single piece of software.
The KNX Design and Planning Tool uses a drag-and-drop interface so you can graphically design and plan KNX projects with speed, accuracy and simplicity.
You can then import all KNX project information such as your devices, building structure, topology, functions and group addresses (complete with all relevant channel text, ID’s, Tags, etc.) directly into ETS.
Information for each of your KNX installations is automatically formatted into professional looking documents while you are using the tool — ready to be saved, shared or printed with the click of a button.
Documentation can then be used for project budgeting, product ordering, billing purposes, installation guides, user manuals, project management, etc.
✅ EASY-TO-USE DRAG AND DROP DRAWING BOARD TO DESIGN A WIDE RANGE OF KNX SYSTEMS
✅ SPECIALIZED KNX GROUP ADDRESS FEATURE READY TO IMPORT DETAILS INTO ETS
✅ HELP END-USERS UNDERSTAND AND VISUALIZE THE POSSIBILITIES OF KNX WITH DETAILED FUNCTION DESCRIPTIONS AND IMAGES
✅ INSTANT REPORTING AND PRINT-OUTS OF ALL NECESSARY KNX DOCUMENTS
✅ COMPANY BRANDED LABELS FOR KNX PUSH-BUTTONS
✅ PLUS A WHOLE LOT MORE!
The best ALL-IN-ONE solution for designing, planning, budgeting and managing the technical requirements and workflows for each stage of a KNX project from start-to-finish.
LEARN MORE AND TRY IT FREE by clicking the link below: